

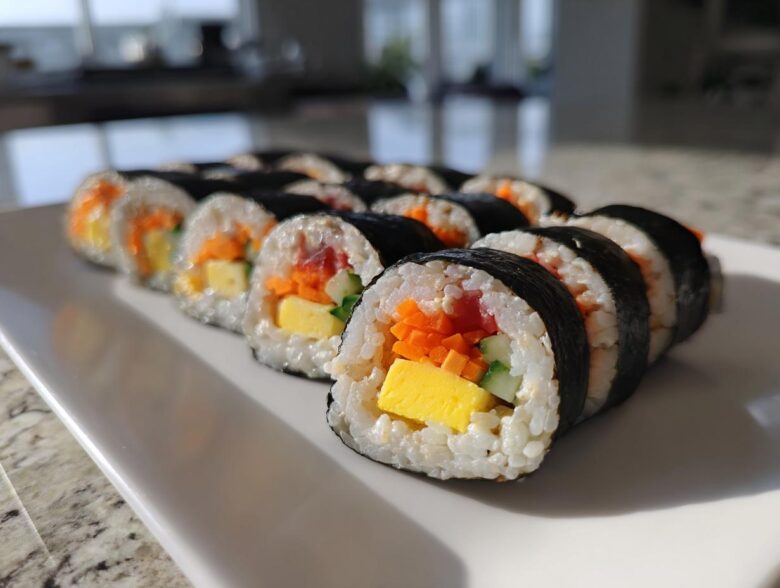
Oh my gosh, have you ever just hit that wall where you desperately need Korean food right now but don’t have two hours to dedicate to making complicated things? Me too! That’s why I rely on this recipe constantly. This isn’t just another roll; this is the ultimate easy & creamy tuna kimbap recipe, and trust me when I say it absolutely blows any store-bought version out of the water. It comes together in about 35 minutes flat, which means it’s perfect for those chaotic weeknight dinners or when I need a stellar, quick homemade snack. We are making classic *Chamchi Kimbap* today, and you’re going to adore how simple it really is.
I’ve linked a little bit about what we do over at the blog site if you’re curious about our general philosophy on cooking homemade food: our favorite kitchen confessions.
Why This Easy Tuna Kimbap Recipe Works for Everyone
What’s the biggest hurdle with tuna kimbap? Usually, people think rolling is scary or that they take a whole afternoon. Not this recipe! It’s honestly a fantastic starting point if you’re new to making *Korean rice rolls*. I promise it’s way quicker than you think.
Here’s why I keep this recipe in heavy rotation:
- It’s seriously fast! We are looking at about 35 minutes total time, from start to slicing.
- That filling is *so* creamy—no dry, sad tuna here! That’s thanks to the right amount of mayo and sesame oil blend.
- It’s shockingly versatile. Pack it for lunchboxes, serve it cold for dinner, or chunk it up for a big party platter. Everyone loves these savory, fresh seaweed wraps.
If you want to check out how I use quick Asian finger foods like this for busy evenings, you can see some ideas here: My favorite quick snacks.
Gathering Your Essential Tuna Kimbap Ingredients
Okay, before we tackle the rolling—the scariest part, I know!—we need beautiful ingredients. Getting your components ready beforehand makes the final assembly feel like magic. We’re focusing heavily on making sure the rice is perfect and the filling isn’t swimming in liquid. It’s all about balance when you’re making amazing *Korean rice rolls*.
For the Seasoned Rice Base of Your Tuna Kimbap
This is non-negotiable, friends. You absolutely must use short-grain white sushi rice. It gets sticky enough to hold its shape without turning into glue when seasoned. We give it a simple shine with:
- 3 cups cooked short-grain white rice, kept warm
- 1 tablespoon rice vinegar
- 1 teaspoon sugar
- 1/2 teaspoon salt
Mix that gently so you don’t smash the grains! Perfect seasoning here is what makes your final tuna kimbap taste authentic.
The Creamy Tuna Salad Filling for Tuna Kimbap
This is where we load up on flavor! The absolute most critical step here is draining that can of tuna until you think it’s dry, and then draining it one more time. Soggy tuna is the enemy of a tight roll!
- 1 (5 ounce) can tuna in water, drained extremely well
- 1/4 cup mayonnaise (use the good stuff!)
- 1 teaspoon sesame oil
- 1/2 teaspoon toasted sesame seeds
Cream it all together. That’s the secret to the best tuna kimbap filling.
Fresh and Flavorful Vegetable and Egg Fillings
We need crunch and color! I quickly blanch my carrots for just 30 seconds so they aren’t raw, but still slightly crisp.
- 1 medium carrot, julienned
- 1/2 English cucumber, seeded and julienned
- 1/2 yellow pickled radish (danmuji), julienned
- 2 eggs, beaten with a pinch of salt (cooked into a thin omelet and sliced)
That pickled radish is vital—it adds a zesty, fantastic tang that cuts through the richness of the tuna salad in your tuna kimbap.
Step-by-Step Chamchi Kimbap Tutorial: How to Make Tuna Kimbap
Alright, take a deep breath! This is the part where we turn all those lovely prepared ingredients into incredible tuna kimbap. We’re going step-by-step, so don’t rush it. If you master the rolling technique here, you’ve basically mastered every kind of Korean rice roll. Remember, lay everything out like a little assembly line on your counter!
Preparing the Rice and Fillings for Perfect Tuna Kimbap
First up, if you haven’t already, make sure your rice is perfectly seasoned while it’s still warm—that’s when the vinegar and sugar sink in best. Don’t let it get cold and hard! While it cools slightly, finish up your fillings. That means draining that tuna until your wrist hurts, mixing the creamy salad, and having your carrots (blanched for 30 seconds only!), cucumbers, radish, and egg strips lined up.
You’re aiming for organization. A disorganized setup leads to messy rolls, and we want neat, beautiful tuna kimbap to take for lunch!
The Technique: How to Roll Kimbap Perfectly
This is the moment of truth! Take your bamboo rolling mat and lay one sheet of Gim, shiny side down. Now, spread that seasoned rice over about two-thirds of the sheet. You MUST leave that top inch or so of the seaweed bare—that’s your seal! Layer your fillings right down the middle, keeping them concentrated. Don’t overstuff it, or it’ll look like a disaster!
Here’s the trick: lift the mat edge closest to you, fold it *over* the fillings, tucking that very first bit of seaweed edge tightly underneath the fillings. Roll forward firmly, using the mat to guide the shape until you hit that bare edge. Feel it getting nice and tight. That beautiful, firm roll is how you make great tuna kimbap.
Finishing and Slicing Your Homemade Tuna Kimbap
Once sealed, the outside needs some love! Lightly brush the entire outside surface of the finished roll with a little extra sesame oil. That adds shine and unbeatable aroma. Now, for slicing: grab your sharpest knife and wet the blade slightly between cuts. Seriously, moisture prevents sticking!
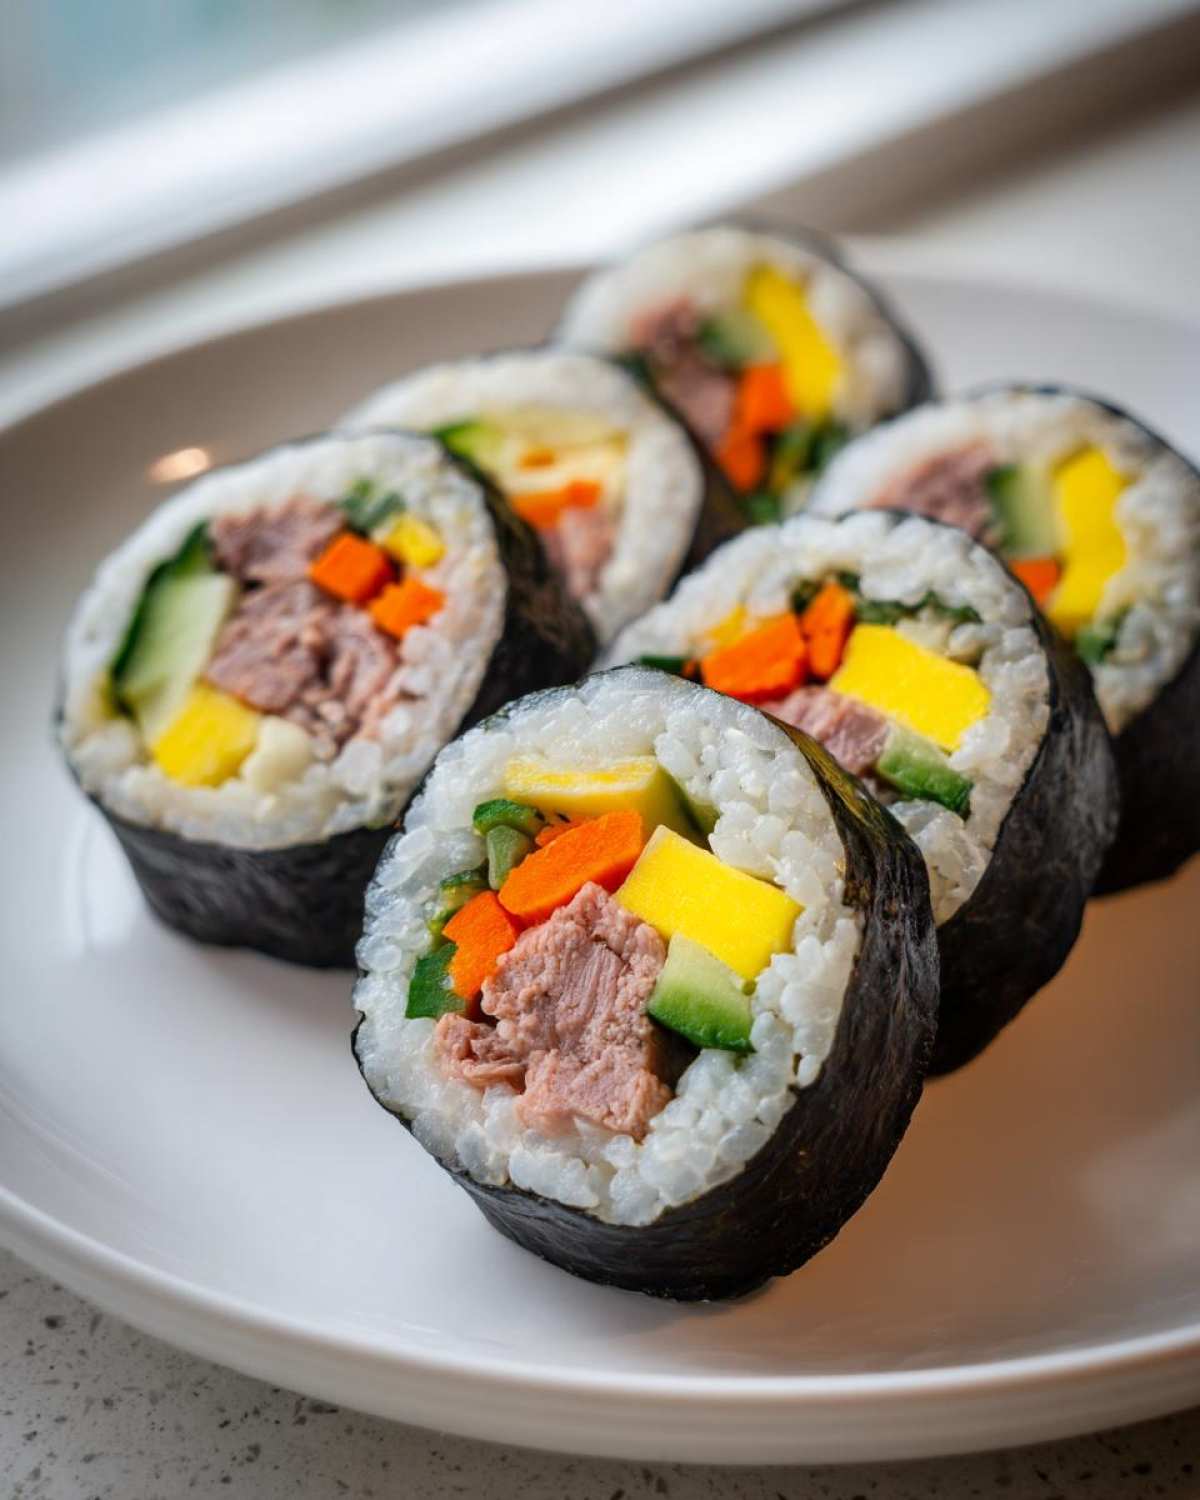
I personally like to slice mine into thick, satisfying pieces—about an inch thick—so you really get a great cross-section of the ingredients. Take your time on the first roll; it’s always the messy one, but after that, you’ll be slicing like a pro!
If you want the full breakdown on why we prep the veggies the way we do, check out my guide on getting those kimbap ingredients right.
Spicy Tuna Kimbap Variation: Adding Heat to Your Korean Rice Rolls
Okay, I know the classic creamy version is unbeatable, but sometimes you just need a little kick, right? If you’re craving something with a bit more fire—maybe you’re used to those spicy tuna rolls at the sushi place—I have the perfect, easy fix for this Spicy Tuna Kimbap!
You don’t need to overhaul the whole recipe, which is the best part. We are sticking with that perfect rice and those crunchy veggies. We just need to give our tuna salad a serious flavor upgrade!
Here is how I riff on the classic filling to make it zesty and hot. I usually stir in about one tablespoon of Gochujang or Sriracha right into the tuna mixture when I’m combining the mayo and the tuna. Start small! You can always add more heat, but you can’t take it away once it’s in there.
This small change transforms the whole roll, making it a fantastic, flavorful savory snack that rivals any good takeaway. It’s a perfect alternative if you usually go for a spicy sushi roll but want that traditional Korean roll structure instead. Try this spicy twist next time you make a batch!
If you’re looking for other ways to bring some serious flavor depth, I’ve got some great ideas over here on handling bold spice profiles: pairing spice with richness.
Tips for Success When Making Tuna Kimbap
I’ve made enough of these rolls to know exactly where things can go sideways, so let me share a few non-recipe tips that turn a decent roll into an absolutely perfect one! Success with tuna kimbap really comes down to managing moisture and using the right pressure.
First up: the seaweed itself. If you’re struggling with Gim that seems too soft and wraps awkwardly, try this quick trick. Just hold the sheet over a very low gas flame for a few seconds, passing it back and forth quickly. Don’t burn it! This light toasting dries it out just enough so it becomes crispier, which helps it hold its shape better when you slice those beautiful bites.
Next, let’s talk about spreading that rice. Don’t press so hard that you feel the mat underneath! You want a thin, even layer. If you mash it down, it concentrates the rice in one spot and makes the roll uneven. Think of it like gently frosting a cake—you cover the surface, but you don’t erode the foundation.
Finally, when you get to the rolling part, remember that initial tuck. That first fold over the fillings needs to be firm and tight, pushing everything inward so there are no air pockets. Tight rolls mean fewer unravelled surprises when you’re cutting them up for serving. Once that first tuck is secure, the rest of the roll is much easier to manage!
If you’re looking for more general cooking wisdom, you can always browse my main dump of cooking ramblings here!
Storage and Make Ahead Korean Snacks
Look, I’ll be honest with you: tuna kimbap is always, always best eaten the same day you make it. The seaweed (Gim) starts to absorb moisture from the rice and fillings, and things get a little soft overnight. If you must store leftovers, wrap those rolls very tightly in plastic wrap first, then put them in an airtight container in the fridge. Eat them within about 12 hours!
But here’s the secret for faster assembly later: you can absolutely prep components ahead of time! This is my go-to strategy for making quick lunchboxes. Cook your rice the day before (store it airtight at room temperature, not the fridge, to keep it soft), and mix up that creamy tuna salad. Keep the fillings separate and chilled. When it’s time to roll the next day, it takes maybe 15 minutes tops!
Serving Suggestions for Your Tuna Kimbap Platter
Now that you’ve made these spectacular rolls, how do you present them? Whether you’re setting up a massive Kimbap party platter for game day or just making a fun dinner for the family, the right sides make a huge difference. Since these rolls are already packed with savory rice, eggs, and creamy tuna, we don’t need anything too heavy alongside them.
The perfect accompaniment is usually something light, tangy, or a little bit vinegary to cut through that richness. Think about what you love dunking things into! For dipping sauces, I usually whip up a super simple mixture of soy sauce with just a tiny splash of rice vinegar and maybe a dash of toasted sesame oil. It’s classic for a reason, and every piece of your seaweed wrap deserves a little dip.
If you’re looking for a fresh side dish that brings a nice, bright contrast to the table, I highly recommend something vinegary to cleanse the palate between bites of those delicious *Korean rice rolls*. Something like a simple pickled cucumber salad or even a bright, zesty pasta salad works beautifully. If you’re feeling inspired to make a slightly larger spread of flavorful savory snacks, you might enjoy how this Greek Orzo Salad balances out richer flavors: my favorite bright orzo salad.
Arrange them close together on a big platter with some kimchi on the side, and you’ve got an instant win that looks incredibly professional!
Frequently Asked Questions About Authentic Tuna Gimbap
I’ve gotten so many questions over the years about tweaking this recipe, so I figured a quick FAQ session would be helpful! People often ask about substitutions or if they can skip steps. Don’t worry, that’s why we’re all here!
Can I use oil-packed tuna instead of water-packed tuna in my tuna kimbap?
You absolutely can! A lot of people prefer the flavor of oil-packed tuna. The main thing you have to watch out for is the grease, since that will totally ruin the texture of your roll. When you drain oil-packed tuna, drain it really, really well, and then I suggest laying the tuna out on a few paper towels for about five minutes. Just gently press down on it to blot some of that excess oil before you mix it into your mayo. If you do that, your Chamchi Kimbap tutorial will turn out perfect!
What is the difference between Kimbap and Sushi Rolls?
This is the eternal question, isn’t it? The biggest difference isn’t the rolling—it’s the rice seasoning! For sushi, the rice is seasoned with just rice vinegar and salt (and sometimes sugar), but it’s meant to taste slightly sharp to contrast the raw fish. For Kimbap, like our tuna kimbap, we season the rice with vinegar, sugar, *and* salt to give it a lightly sweet and savory flavor profile overall. Plus, Kimbap almost always uses cooked or cured fillings, never raw fish like sushi often does.
What are the best fillings for Kimbap besides the standard ingredients?
Honestly, the beauty of Kimbap with canned tuna is how flexible the filler can be! If you want to swap out your cucumber or add something extra, try these additions. Shredded imitation crab sticks (Kani) blend beautifully with the creamy tuna. A few strips of cooked spinach tossed lightly with sesame oil are always fantastic for color and nutrition. Or, if you like a little funk, a thinly sliced strip of Spam that’s been pan-fried until crispy works surprisingly well as a savory counterpoint!
If you’ve got other burning questions, always feel free to drop a line using the contact page: Get in touch with me!
Nutritional Estimate for This Tuna Kimbap Recipe
I know some of you are tracking macros or just curious about what’s in this delicious lunch, so I wanted to give you a ballpark idea of what this recipe shakes out to be. Remember, this is just an estimate! The exact numbers will depend on the brand of mayo you use, how much rice you pack into each roll, and if you decide to use avocado instead of cucumber.
These values are based on a standard serving size of 8 pieces split across the four rolls in the recipe. Think of this as satisfying, flavorful comfort food that still packs a pretty good punch of protein!
Here’s the general breakdown:
- Serving Size: 8 pieces
- Calories: 350
- Fat: 15g
- Saturated Fat: 2.5g
- Trans Fat: 0g
- Carbohydrates: 45g
- Fiber: 2g
- Protein: 12g
- Cholesterol: 55mg
- Sodium: 450mg
- Sugar: 4g
See? Not bad at all for something so completely satisfying! It’s easily one of my favorite healthy seaweed snacks that doubles as a filling meal. We use good quality ingredients, so even though we have some fat from the mayo, it’s mostly keeping that texture creamy and wonderful.
Because every kitchen setup is slightly different, treat these numbers as a guideline. If you’re ever concerned about ingredients or tracking what you eat, you can always check out our general policy stuff here: Our stance on data and health estimates.
Share Your Homemade Tuna Kimbap Creations
Now that you’ve mastered the art of the roll—and hopefully found out how easy tuna kimbap truly is—I want to see what you made! Seriously, nothing makes me happier than seeing your kitchen adventures.
Did you stick to the classic creamy filling, or did you go wild with the spicy variation we talked about? Let me know in the comments below! Seriously, drop a star rating if this recipe saved your busy weekday lunch routine—those ratings really help new folks find the recipe!
If you snap a picture of your beautiful, tightly rolled *Korean rice rolls*, tag me on social media! I love cheering you on and hearing about your favorite way to serve these as part of your family lunch ideas.
For my latest meal prep inspiration and quick dinner ideas, check out what I’m cooking this week over in the lunch category: My quick lunch inspiration.
PrintEasy & Creamy Tuna Kimbap (Chamchi Kimbap)
Make classic Korean tuna rice rolls at home. This recipe provides creamy tuna filling and simple rolling instructions perfect for lunchboxes or snacks.
- Prep Time: 25 min
- Cook Time: 10 min
- Total Time: 35 min
- Yield: 4 rolls (about 32 pieces)
- Category: Main Dish
- Method: Rolling
- Cuisine: Korean
- Diet: Vegetarian
Ingredients
- 4 sheets Gim (seaweed sheets for Kimbap)
- 3 cups cooked short-grain white rice, warm
- 1 tablespoon rice vinegar
- 1 teaspoon sugar
- 1/2 teaspoon salt
- 1 (5 ounce) can tuna in water, drained well
- 1/4 cup mayonnaise
- 1 teaspoon sesame oil, plus more for brushing
- 1/2 teaspoon toasted sesame seeds
- 1 medium carrot, julienned
- 1/2 English cucumber, seeded and julienned
- 1/2 yellow pickled radish (danmuji), julienned
- 2 eggs, beaten
- Pinch of salt for eggs
Instructions
- Prepare the rice: In a large bowl, mix the warm rice with rice vinegar, sugar, and salt until evenly seasoned. Set aside to cool slightly.
- Prepare the fillings: Quickly blanch the julienned carrots in boiling water for 30 seconds, then immediately plunge into ice water. Drain well.
- Cook the egg: Lightly salt the beaten eggs. Cook them into a thin omelet in a lightly oiled pan over medium heat. Remove, roll up, and slice thinly into strips.
- Make the tuna salad: In a separate bowl, combine the drained tuna, mayonnaise, 1 teaspoon sesame oil, and sesame seeds. Mix until creamy.
- Assemble the rolls: Lay one sheet of Gim shiny side down on a bamboo rolling mat. Lightly brush the top edge with water to help seal later.
- Spread a thin, even layer of seasoned rice over two-thirds of the Gim, leaving the top edge bare.
- Arrange the fillings in a line across the center of the rice: a strip of tuna salad, egg strips, carrot, cucumber, and pickled radish.
- Roll tightly: Lift the edge of the mat closest to you and fold it over the fillings, tucking the edge of the Gim under the ingredients. Continue rolling firmly, pressing gently to shape the roll.
- Seal the edge with a dab of water if needed. Repeat with remaining ingredients.
- Finish the rolls: Lightly brush the outside of each finished roll with sesame oil. Slice each roll into bite-sized pieces using a sharp, slightly moistened knife.
Notes
- For a crispier texture, lightly toast the Gim sheets over a low flame for a few seconds before using.
- If you prefer a less sweet rice, reduce the sugar in the rice seasoning to 1/2 teaspoon.
- You can substitute avocado slices for cucumber for added creaminess.
Nutrition
- Serving Size: 8 pieces
- Calories: 350
- Sugar: 4
- Sodium: 450
- Fat: 15
- Saturated Fat: 2.5
- Unsaturated Fat: 12.5
- Trans Fat: 0
- Carbohydrates: 45
- Fiber: 2
- Protein: 12
- Cholesterol: 55