

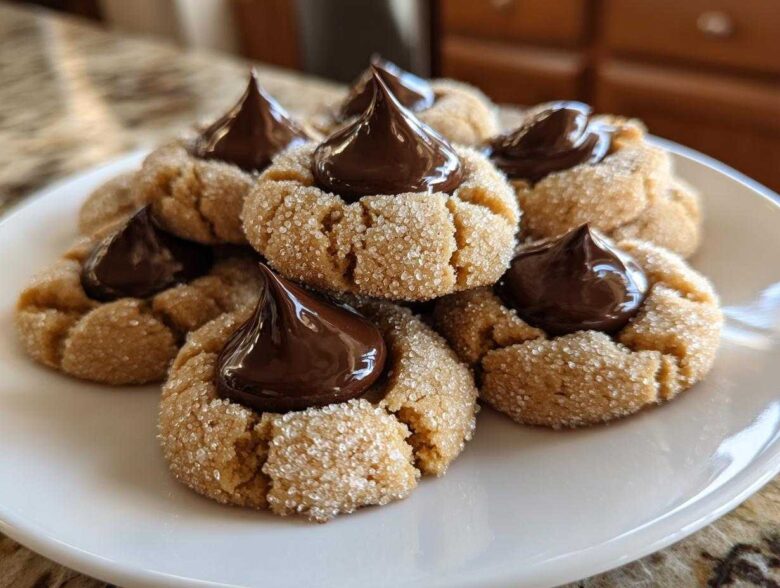
Oh my goodness, is it that time of year again? The smell of cinnamon and burnt sugar always pulls me right back to being seven years old, perched on a wobbly stool watching my Aunt Clara ice cookies until her fingers turned sticky white. If there’s one cookie that screams classic holiday baking, it has to be the famous peanut butter blossoms. I spent years fighting with recipes that ended up too crumbly or too hard by Christmas morning. Trust me, you don’t want that! My absolute favorite part about this recipe is that it guarantees you get that signature soft and chewy peanut butter cookie base every single time, topped with that perfect, slightly melted Hershey’s Kiss.
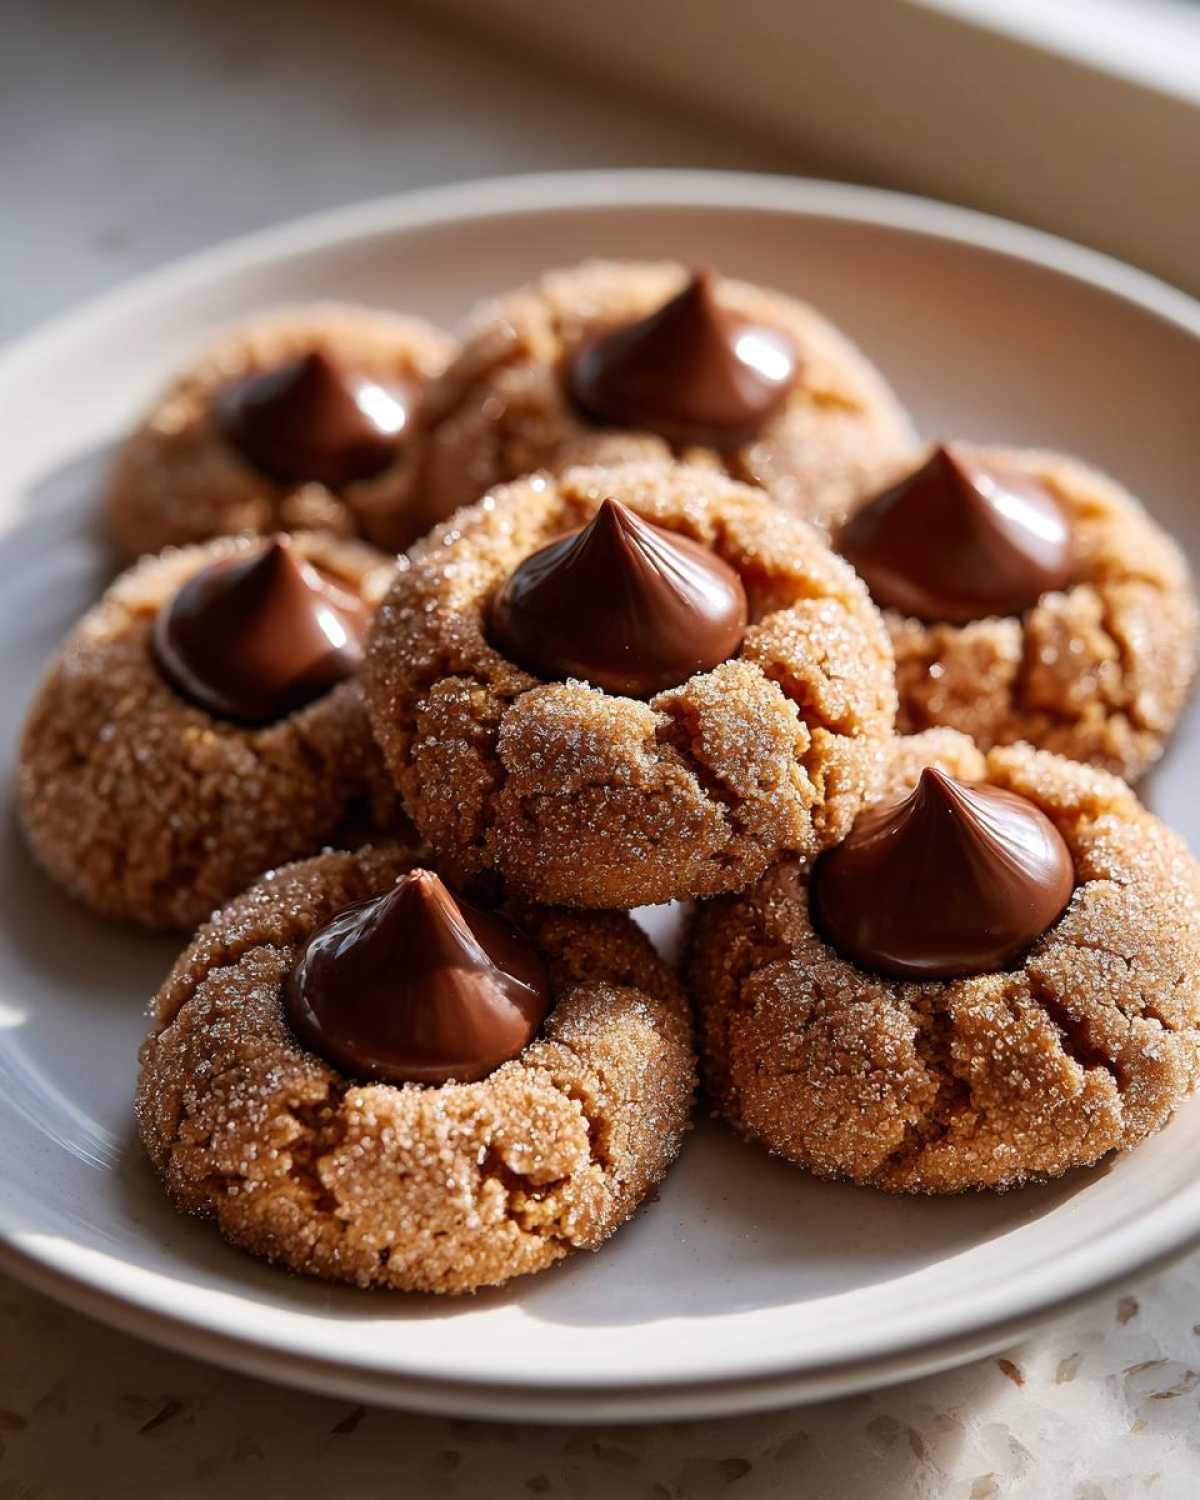
Why This is the Best Soft and Chewy Peanut Butter Blossoms Recipe
What makes this recipe a true family favorite cookie recipe? It’s all about the texture, honestly! We are past the dry, crumbly cookies of our childhood, right? This soft and chewy peanut butter recipe is engineered specifically to stay wonderfully tender, even a few days after you bake them for your cookie exchange. Plus, there’s no complicated chilling time required—we are talking mix-and-bake ease!
Quick Overview: Prep Time and Yield for Your Peanut Butter Blossoms
You won’t believe how fast these come together. We barely need 15 minutes of prep time, and they only bake for about 10 minutes. You get about three dozen perfect cookies, which is exactly the right amount for sharing (or, let’s be real, hoarding).
Gathering Ingredients for Perfect Peanut Butter Blossoms
Okay, let’s talk supplies. You can’t make amazing simple peanut butter desserts with subpar ingredients. I have the full list below, but seriously, pay attention to the state of your butter! It must be softened—think squishy, but definitely not melted or oily. We need that fluffiness when we cream it with the sugar to get the right structure.
Also, make sure you have those Hershey’s Kisses all unwrapped and ready to go *before* the cookies come out of the oven. They need to be waiting patiently nearby! The final count should get us around three dozen cookies, depending on how large you roll your dough balls.
Ingredient Notes and Substitution Tips for Peanut Butter Blossoms
When it comes to the peanut butter, I always stick to creamy for the best smooth dough, but if you love a bit of texture mixed into your base, crunchy works too! The most important rule for these peanut butter blossoms is sticking those ingredients to the recipe card. Regarding substituting ingredients, that wonderful note in the recipe suggests that using crunchy peanut butter is totally fine if you prefer texture over smoothness.
Step-by-Step Instructions for Classic Peanut Butter Blossoms
Alright, let’s get baking! The steps here are so straightforward. Remember what I said earlier about not overdoing it? That’s your mantra for this recipe. Once you add the flour mixture to the wet ingredients, you mix on low speed *just* until you don’t see any more dry streaks. Seriously, stop mixing! Overmixing is the enemy of soft cookies and will make your crinkle top peanut butter cookies tough instead of tender.
Once the dough is just combined, it goes straight into the sugar bath. This is crucial for that beautiful, snowy exterior. Roll those little balls up nicely—about an inch across—and make sure they are completely coated in the extra granulated sugar. That sugar coating helps create the visual cracks we all love.
Bake them quickly at 375 degrees. You’re looking for 8 to 10 minutes. The cookies need to come out looking slightly puffy but not deeply brown on the bottom. The timing for the chocolate is the most important second of the whole process!
Achieving the Signature Crinkle Top on Your Peanut Butter Blossoms
That crinkle top happens because the outside cools fast while the inside is still warm and soft. As soon as those trays come out of the oven, grab your unwrapped Hershey’s Kisses. You have to press that chocolate right into the center immediately. That heat melts the bottom of the Kiss just enough so it adheres perfectly. This is how you nail the aesthetic for your gorgeous peanut butter blossoms!
Tips for Success Making Soft and Chewy Peanut Butter Blossom Cookies
Okay, even the easiest recipes can have a hiccup, especially during the rush of easy holiday cookies season! If you find your cookies spreading out too much and turning flat, you have two options. First, make sure your butter wasn’t too warm when you started mixing—we need that structure! Second, try chilling the dough for just 30 minutes before you roll them into balls. That helps everything firm up a bit.
Another quick tip: if you want that chocolate kiss to stick perfectly and not pop off when cooled, you must press it in the second the cookies leave the oven. If you wait even a minute or two, the surface firms up too much, and you’ll end up with loose Kisses rolling around your counter. The moment you pull those peanut butter blossoms out, work fast!
Storing and Keeping Your Peanut Butter Blossoms Fresh
The best part about making a big batch is having leftovers, right? Luckily, these cookies hold up really well! Since we focused so hard on making them soft and chewy, we want to keep that texture intact.
You should definitely store your finished cookies in an airtight container. That keeps out any unnecessary air that might try to dry them out overnight. I usually keep mine right on the counter at room temperature. Seriously, avoid the fridge!
Why avoid the fridge? Cold temperatures make cookies—especially those made with lots of butter—turn instantly hard. You want to bite into a soft treat, not chew on a little peanut butter brick!
If stored properly in a good container, they should stay perfectly fresh and delicious for about five days. If you stack them, try putting a small piece of wax paper between layers so the chocolate doesn’t stick to the cookie tops below.
Variations for Your Peanut Butter Cookie with Chocolate Center
While the classic recipe is my heart and soul, sometimes you need a little shake-up, even when baking your beloved peanut butter blossoms. The base is so reliable that it welcomes small tweaks!
If you want to elevate that texture just a touch, try stirring in maybe half a teaspoon of flaky sea salt right before you add the flour mixture. It really pops against the sweetness of the peanut butter and the chocolate center.
Also, don’t feel glued to just plain flour! I sometimes swap out a quarter cup of the all-purpose flour for almond flour for a slightly richer feel in the base of my peanut butter cookie with chocolate center. They bake up beautifully, making these a stellar option for parties.
Frequently Asked Questions About Peanut Butter Blossoms
I know that even with the most perfect recipe, sometimes we still have little questions bouncing around. It’s okay! That’s why I put together this quick Q&A section for you. Hopefully, this covers any little worries you have about turning out the absolute best Christmas cookies!
Can I make these Peanut Butter Blossom Cookies ahead of time?
Yes, you absolutely can! You can mix the dough up, roll it totally into balls, and coat them in the sugar. Then, just arrange the sugared balls on a cookie sheet lined with parchment and pop that tray into the fridge for a day or two. You might need to bake them for just a minute or two longer since they’ll be cold. For the finished cookies, they store so well at room temperature that you usually don’t need to plan too far ahead, but they certainly last well enough for easy holiday prep!
Why does my chocolate Kiss sink or melt completely into my peanut butter blossoms?
This is almost always an oven timing mistake! You need to press that chocolate kiss into the cookie the *second* it comes out of the hot oven. If you wait even 60 seconds, the cookie top sets up too much, and the chocolate doesn’t stick right. If it’s melting too much, it might mean your oven temperature runs too hot, or maybe you baked them a little long. For peanut butter blossoms, pull them when they look slightly puffed!
Do I have to use creamy peanut butter?
Nope! While I prefer creamy because I love that smooth texture underneath all the sweetness, crunchy peanut butter works in a pinch! Using crunchy is a great way to change up the texture of your Peanut Butter Blossom Cookies. Just note that the dough might feel a little less uniformly mixed.
Can I use natural, oily peanut butter in this recipe?
I wouldn’t recommend it for this specific recipe, to be honest. Natural peanut butters tend to separate, and that extra oil can cause your classic peanut butter cookies to spread way too much in the oven. You want that thick, cohesive look so you can press in the chocolate center perfectly. Stick to commercial, processed peanut butter for this classic!
Is this recipe good for high-altitude baking?
If you are baking way up high, you might need to make slight adjustments. Generally, for high altitude, you might need to slightly increase your flour by a tablespoon or so, and slightly reduce your leavening agents like baking soda. It’s always a good idea to check a specific high-altitude guide for adjusting ratios when making peanut butter blossoms!
Estimated Nutrition Facts for Classic Peanut Butter Blossoms
I know some of you are tracking things closely, and while Aunt Clara never worried about counting calories back in the day, I totally get it! Providing you with an approximate nutritional breakdown is just part of being a good source of trusted recipes. This helps you plan your holiday cookie trays better.
Remember that these numbers are just estimates, sweetie. They are based on using standard ingredients like all-purpose flour and creamy peanut butter. If you sneak in extra chocolate or decide to use a different brand of PB, the totals will shift. We always put a little disclaimer on this sort of thing over at the site disclaimer.
Here’s what you can generally expect for one single, perfect cookie:
- Serving Size: 1 cookie (amazing!)
- Calories: About 150
- Total Fat: 8g (worth every single bite, trust me)
- Carbohydrates: 18g
- Protein: 3g
You can also see the details on sugar (about 13g) and sodium. It’s a classic American cookie, so it has that perfect level of sweet and salty goodness you crave in your simple peanut butter desserts!
Share Your Perfect Peanut Butter Blossoms Experience
Well, that’s it! Now you know all my secrets for achieving that soft, chewy center and that picture-perfect crackle top on your peanut butter blossoms. I truly hope these cookies bring as much joy to your kitchen as they do mine.
Did you try them? I want to hear all about it! Please leave me a rating down below and tell me how they turned out for your holiday baking table. Seriously, drop a comment—I read every single one!
PrintClassic Soft and Chewy Peanut Butter Blossoms
Make soft, chewy peanut butter cookies with a signature chocolate kiss center. This recipe is simple and perfect for holiday baking.
- Prep Time: 15 min
- Cook Time: 10 min
- Total Time: 25 min
- Yield: About 3 dozen cookies
- Category: Dessert
- Method: Baking
- Cuisine: American
- Diet: Vegetarian
Ingredients
- 1 cup unsalted butter, softened
- 1 cup granulated sugar
- 1 large egg
- 1 teaspoon vanilla extract
- 1/2 cup creamy peanut butter
- 2 1/4 cups all-purpose flour
- 1 teaspoon baking soda
- 1/2 teaspoon baking powder
- 1/4 teaspoon salt
- 1/2 cup granulated sugar, for rolling
- About 36 Hershey’s Kisses, unwrapped
Instructions
- Preheat your oven to 375 degrees Fahrenheit. Line baking sheets with parchment paper.
- In a large bowl, beat the softened butter and 1 cup of sugar until creamy.
- Beat in the egg and vanilla extract. Mix in the peanut butter until combined.
- In a separate bowl, whisk together the flour, baking soda, baking powder, and salt.
- Gradually add the dry ingredients to the wet ingredients, mixing on low speed until just combined. Do not overmix.
- Place the remaining 1/2 cup of sugar in a shallow dish.
- Roll the dough into 1-inch balls. Roll each ball completely in the sugar until coated.
- Place the sugared balls about 2 inches apart on the prepared baking sheets.
- Bake for 8 to 10 minutes. The cookies should look slightly puffed but not deeply browned.
- Remove the cookies from the oven. Immediately press one unwrapped Hershey’s Kiss into the center of each warm cookie.
- Let the cookies cool on the baking sheet for 5 minutes before transferring them to a wire rack to cool completely. The chocolate will set as they cool.
Notes
- For the best crackle top, press the chocolate kiss into the cookie immediately after removing it from the oven while the cookie is still hot.
- If you chill the dough for 30 minutes, the cookies may spread less, resulting in a slightly thicker cookie.
- You can substitute creamy peanut butter with crunchy if you prefer texture in the cookie base.
Nutrition
- Serving Size: 1 cookie
- Calories: 150
- Sugar: 13g
- Sodium: 75mg
- Fat: 8g
- Saturated Fat: 3g
- Unsaturated Fat: 5g
- Trans Fat: 0g
- Carbohydrates: 18g
- Fiber: 1g
- Protein: 3g
- Cholesterol: 15mg