

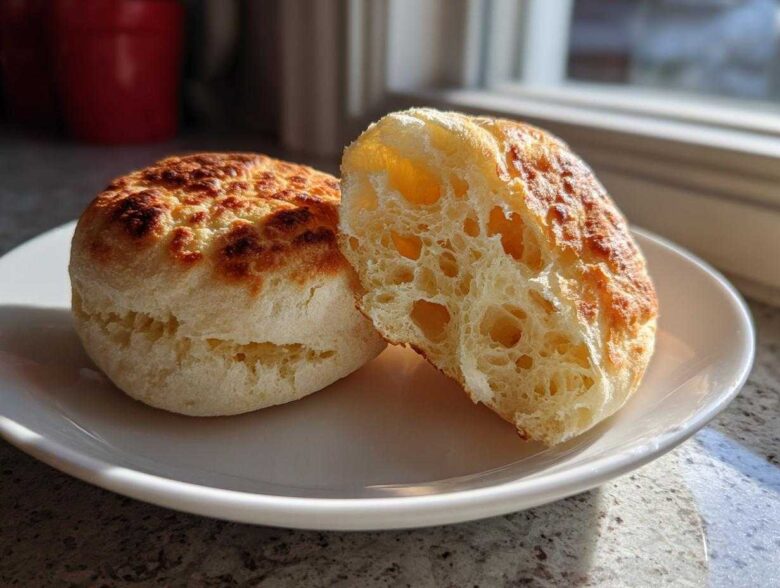
There’s just nothing like the smell of fresh bread hitting the griddle in the morning. I tried so many sad, dense versions before perfecting this one, and honestly, I felt like I cracked the code. Forget those store-bought frisbees! This recipe is the secret weapon for achieving those deep, airy holes—the famous ‘nooks and crannies’—that make breakfast legendary. If you’ve ever wanted that perfect texture, you should definitely check out what inspires our baking here. Trust me, once you master these **homemade english muffins** on your own stovetop, you’ll never look back. It’s breakfast comfort food at its absolute finest, and it’s easier than you think!
Why This Is the Best English Muffin Recipe for Home Bakers
Listen, I tried every trick in the book to avoid sad, flat muffins. The reason this particular **English muffin recipe** shines is all about respecting the yeast and the cooking temperature. It’s not about brute force; it’s about letting the dough do its job slowly. This method ensures you get maximum fluffiness and those gorgeous internal tunnels you dream about. If you want even more wonderful breakfast inspiration, check out our category page!
The way we achieve great **homemade english muffins** focuses on being gentle and patient. It’s about technique!
- It uses active dry yeast properly activated, so you get a reliable, beautiful rise every single time.
- The amount of liquid is perfectly calculated—enough to make the dough sticky, but not so much that it spreads out into pancakes on the griddle.
- We treat the dough like it’s precious glass! Rough handling kills those little air bubbles we’re working so hard to create.
Achieving Perfect Nooks and Crannies Muffins
The secret to those coveted holes—the hallmark of real nooks and crannies muffins—is actually super simple: low and slow heat. If the griddle is too hot, the outside seals up instantly before the inside has time to puff up and create those internal pockets. We cook them gently, forcing the steam to work its magic inside that sealed crust.
Tips for Fluffy Breakfast Muffins Texture
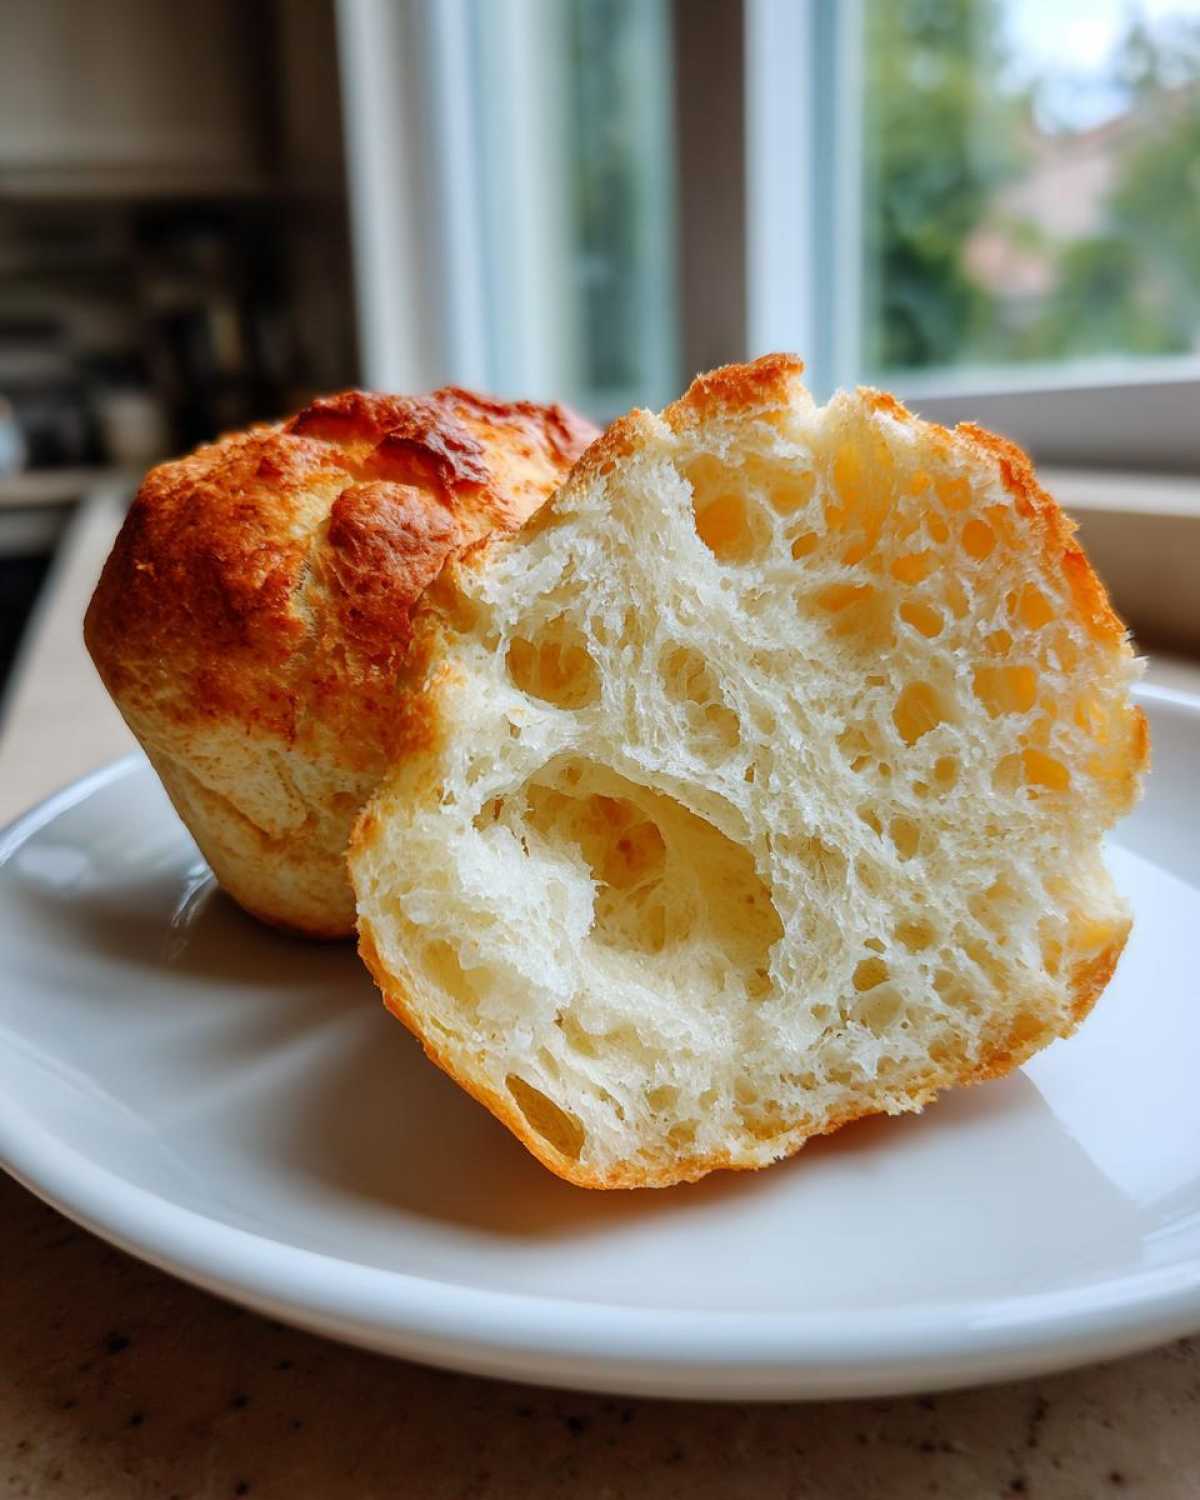
For that soft bite that distinguishes great **homemade english muffins**, the temperature of your milk is everything. It needs to be nice and warm—think bathwater temperature, not scalding! This wakes up the yeast perfectly. Also, don’t go crazy kneading! A few gentle turns is all you need. Over-kneading develops too much structure, leading to a chewy exterior but a dense middle instead of a light and fluffy texture. You want these soft enough for dipping into jam!
Gathering Ingredients for Homemade English Muffins
Okay, let’s talk about what you need to pull this off. For a standard batch of 8 glorious muffins, the ingredient list is surprisingly short, which I love! It just goes to show you don’t need a million things to make something truly special for yourself. These humble pantry staples combine to create something absolutely magical when treated right.
- 2 cups all-purpose flour (We stick to AP flour for that classic soft crumb texture!)
- 1 tablespoon granulated sugar
- 1 teaspoon salt
- 1 packet active dry yeast (That’s exactly 2 1/4 teaspoons, folks—don’t eyeball the yeast!)
- 3/4 cup warm milk (This is important!)
- 2 tablespoons unsalted butter, melted
- Extra flour for dusting (You’ll need more than you think!)
- Butter or oil for griddle
Ingredient Clarity and Preparation Notes
A few quick notes on how to prepare these items so your dough behaves perfectly. Remember, baking is chemistry, and small details matter when you are aiming for that fantastic texture!
First, that milk temperature is non-negotiable, trust me. You need it warm enough to wake up that beautiful yeast, ideally between 105–115°F. If it’s too cool, your dough will sigh instead of rise. If it’s too hot, you’ll kill the yeast dead! That warm milk activates the yeast immediately, and you should see it getting foamy in about five minutes.
When you get to the final cooking step, you need a good dusting material. I use cornmeal because it gives a tiny bit of nice texture to the bottom, but flour works just as well. Just make sure you dust your surfaces well before rolling out the dough—we don’t want any sticking catastrophes!
Step-by-Step Instructions: How to Make English Muffins
Alright, this is where the magic happens! Making bread from scratch sounds intimidating, but these **homemade english muffins** are surprisingly simple once you follow the timeline. The key here is patience during the rising and a gentle hand during cooking. We aren’t making tough bread that fights back; we are creating tender breakfast clouds!
Don’t worry if you’ve never worked with active dry yeast before. As long as you keep things warm and don’t overwork the dough after the first mix, you are going to smash this!
Mixing and First Rise for Your Homemade English Muffins
First, we whisk all the dry stuff together—flour, sugar, salt—in a big bowl. Then, we treat the yeast kindly by dissolving it in that warm milk until it gets foamy; that’s how you know it’s alive and ready to work! Combine the wet and dry ingredients using a sturdy wooden spoon until you get a messy, shaggy dough that looks like wet cement—seriously, don’t panic, that’s perfect. Turn that shaggy mess onto a lightly floured counter and knead it maybe 5 or 6 times—just enough to bring it into a ball. Cover the bowl and let it sit in a warm spot for a good 1 to 1.5 hours. You’ll know it’s ready when it has happily doubled in size, looking plump and proud!
Cutting and Resting the Dough Rounds
Once your dough has puffed up, you gently punch it down—no aggressive slamming allowed! On your floured surface, you want to roll this lovely dough out until it’s about a half-inch thick. I use the rim of a wide glass or a 3-inch cutter to stamp out all the rounds. Lay these little guys on a baking sheet that you’ve dusted generously with flour or cornmeal so nothing sticks. Cover them loosely with a clean towel and let them sit for just 30 minutes. This short rest is important; it lets the dough relax right before hitting the heat.
Mastering Stovetop English Muffins Cooking
Now for the crucial part for delicious **stovetop english muffins**: Heat management! You need a dry griddle or a heavy skillet set over *medium-low* heat. If the heat is too high, you burn the outside and the inside stays raw—no nooks that way! Place your rested rounds onto the heat and let them cook slowly for about 8 to 12 minutes per side. You only flip them once—resist the urge to keep peeking or pressing them! We want them golden brown all over, and they should reach an internal temperature of 200°F to ensure they are cooked through. For more tips on perfecting your baking technique in the home kitchen, check out my latest blog post!
Tips for Success with Your English Muffin Recipe
I have a few hard-and-fast rules that take these **homemade english muffins** from ‘good’ to ‘I’m never buying them again’ territory. Honestly, most of the success comes after they leave the griddle, so pay attention to the finishing steps!
If you want to see how these fantastic **yeast bread recipes** can change your Saturday mornings, hop over to my favorite yeast bread posts!
The Fork Trick: Opening Your Homemade English Muffins
This is the most important piece of advice I can give you regarding texture. When you are ready to eat your delicious, warm muffins, you absolutely must use a fork to split them open, not a knife. I know it feels weird, especially when they are piping hot, but hear me out.
A knife slices straight across the crumb structure you so carefully developed on the griddle. It closes up those beautiful little tunnels! A fork, however, gently pries the halves apart without crushing the tiny airways created by the slow cooking process. This action maximizes those famous **nooks and crannies** and ensures you get the fluffiest, most delicious breakfast possible. It makes a huge difference, I promise!
Ingredient Notes and Simple Substitutions
I totally get it—sometimes the pantry looks weird, or you just don’t have that exact item on hand right when the craving for **fluffy breakfast muffins** hits. Don’t stress! While the core recipe is classic, we can usually make a few swaps without totally ruining the texture.
For instance, if you’re out of active dry yeast, you can often reach for instant yeast instead. If you do, you can skip that step where you dissolve it in the milk; just dump the instant yeast right into your dry ingredients when you whisk everything together. It’s a little quicker, which could lead to a slightly faster rise, but it works!
What about flour? This recipe calls for all-purpose flour because we are going for that light, tender chew. If you swap in bread flour, be warned: it has higher protein, which means more gluten development. Your muffins might turn out tougher or chewier than mine. If you must use it, definitely knead even less than I suggested—like maybe just three turns!
Can you use water instead of milk? Sure, but wow, are you losing out! Milk adds richness and helps tenderize the crumb. If you’re dairy-free or temporarily out of milk, soy or oat milk are great substitutes that don’t drastically alter the result. Just make sure whatever you use is the correct warm temperature to wake up your yeast.
Serving Suggestions for Your Freshly Baked Muffins
Now that you have these gorgeous, warm, crater-filled slices of heaven ready, the real fun—and by fun, I mean the decorating part—finally begins! These **homemade english muffins** deserve the best toppings imaginable. Don’t insult them with thin, plastic-tasting butter! We need the good stuff here.
For that ultimate **breakfast comfort food** feeling, melting a generous pat of real, salted butter into the nooks and crannies while the muffin is still warm is non-negotiable. It just dissolves perfectly into every ridge. After that, a bright strawberry jam or a tangy homemade marmalade sings right alongside the slightly yeasty flavor.
But really, these are built for big mornings, which means they are fantastic as **breakfast sandwich bread**! My favorite way to use them is to toast them well, spread a thin layer of Dijon mustard on one side (trust me on this one!), and top it with a fried egg, a slice of sharp cheddar, and maybe a piece of crispy Canadian bacon. They hold up so much better than regular toast, preventing the dreaded yolk slide.
If you need ideas for something completely different for dinner someday, check out how I use slider buns—the shape is similar!—in my Sloppy Joe Sliders recipe for inspiration on building big flavor on small bread bases.
Honestly, once you make a batch of these **homemade english muffins**, your weekend breakfast game is forever changed. Enjoy every single buttery, toasty bite!
Storage and Reheating Instructions for Homemade English Muffins
I know once you bite into that first warm, buttery muffin, you might want to eat the whole batch right there. And honestly, I don’t blame you! But these yield about 8 muffins, so you’ll probably have leftovers. Good news: these freeze wonderfully and reheat like a dream, which is perfect for busy weekday mornings.
The key to maintaining that lovely soft crumb when storing your **homemade english muffins** is making sure they are completely cool before you put them anywhere, or you risk massive condensation and sogginess. Don’t even think about wrapping them up until they’ve spent at least an hour on the wire rack!
If you plan to eat them within a couple of days, storing them at room temperature in an airtight container is fine. They’ll stay soft. Honestly, they usually don’t last that long around my house, but they keep well for about 3 days max on the counter.
Freezing for Weekday Breakfast Bliss
For keeping them longer—say, for up to a month or two—freezing is the way to go. First, let them cool completely. Then, I highly recommend slicing them in half *before* freezing. This means you are ready to go straight to the toaster or griddle whenever the craving hits!
Wrap the individual halves tightly in plastic wrap, then place all the wrapped halves into a heavy-duty freezer bag. Squeeze out as much air as you can before sealing it up. This double-wrapping protects them from freezer burn, which is the mortal enemy of **freshly baked muffins**!
The Best Way to Reheat Frozen Muffins
When you want to enjoy one, just pull the frozen half right out of the bag. You have two amazing options, depending on how much time you have!
If you only have two minutes, pop that frozen, split muffin directly into a toaster slot. It toasts beautifully, and the edges get that perfect little crunch while staying soft inside. It’s fast and easy!
If you have five minutes and want that *straight-from-the-griddle* texture, skip the toaster! Heat a dry skillet over medium heat—or even better, use a toaster oven if you have one. Lay the frozen halves cut-side down and warm them for 2–3 minutes until they are heated through and slightly golden on the cut side. This process reactivates the butteriness and brings back that soft, fluffy texture you love in your **homemade english muffins**. It’s absolute perfection!
Frequently Asked Questions About English Muffin Recipe
If you’ve been following along, you probably have a few lingering questions, so I wanted to tackle some of the common ones before you dive into mixing that beautiful dough. Baking anything with yeast involves a few quirks, but once you know the rules, you’ll be unstoppable!
Why are my English muffins pale after cooking?
Oh, the dreaded pale muffin! This almost always comes down to heat, especially since we are focusing on stovetop english muffins. If your muffins come out looking more beige than golden, your griddle wasn’t hot enough. Remember, we are cooking them low and slow, but ‘low’ still needs to be hot enough to create that beautiful, toasty crust. If the heat is too low, the moisture inside escapes slowly, resulting in a dry muffin that never browns properly. Turn the heat up just a touch next time! They should take around 10 minutes per side, not 20.
Can I make this a no-knead English muffin recipe?
That is a super popular thing these days, wanting to skip the kneading! While you *can* push this dough a bit further without kneading—since an extra-long first rise helps develop some gluten elasticity—I wouldn’t recommend a full no knead English muffin approach here. Our recipe specifically calls for gentle kneading (just 5-7 times) because the slow rise just isn’t quite enough to develop the necessary structure to hold up to the griddle heat. If you skip that light knead, the muffins tend to spread out too much and you lose those beautiful, defined edges we are looking for in breakfast comfort food.
How can I make these sourdough English muffins light and airy?
That’s a fantastic question! Switching to sourdough is a whole different ballgame and requires a real culture adjustment, but boy, is it rewarding. If you are using a mature, active sourdough starter, you’ll want to heavily reduce or eliminate the packet of yeast entirely. The temperature for mixing will be slightly warmer than what I listed for the yeast, usually closer to 118°F, to keep the starter happy. The biggest difference is time; the rise will take much, much longer—often 4 to 6 hours instead of just one! But the flavor you get from those sourdough English muffins is unbeatable. If you want to learn more about maintaining your starter, I have a whole guide dedicated to that over on our contact page if you want to reach out!
What is the best flour substitute for these yeast bread recipes?
For achieving the classic soft, slightly chewy texture that makes a great English muffin recipe, all-purpose flour is your best friend. If you absolutely must substitute, whole wheat flour is the next best option, as noted in the recipe tips. But please, don’t swap more than half of the amount! Whole wheat flour is heavier and absorbs more liquid, which means it will naturally result in a denser muffin, though it adds a nice nutty flavor. If you try to use something like almond flour or coconut flour, the structure will fail entirely because they lack gluten, and you’ll end up with little crumbly discs instead of something you can split open!
Share Your Homemade English Muffins Experience
Okay, baker friends, you’ve done the work! You’ve mixed, you’ve waited patiently for that rise, and you’ve managed the finicky heat of the griddle. Now I absolutely need to know how they turned out! There is truly no better reward than seeing someone else find joy in a perfect batch of **homemade english muffins**.
Please, please, please leave a comment below letting me know how they turned out! Did you get those glorious tunnels? Did you manage to resist using a knife and actually use a fork? Humor me and tell me your favorite topping! Was it just simple butter, or did you go wild with avocado?
If you took pictures—and I hope you did, because I love seeing your creations—tag me on social media! Seeing your breakfast spread makes my day and it really helps other people feel confident trying this recipe too. Your success is my success!
If you have any final lingering questions or spot something you think I missed, shout it out in the comments. We are building a community of great home bakers here, and your feedback helps keep this **English muffin recipe** the best it can be. Plus, knowing you enjoyed this recipe is a lovely reminder of why I share everything I learn! For details on how we handle your information, you can check out our privacy policy here, but rest assured, your comments are safe with us!
Estimated Nutritional Data for This Recipe
Now listen close, because I know some of you count macros or just like knowing what you’re eating before you slather on that jam. I’ve put together the estimated nutrition facts based on my recipe measurements, but remember, this is a guideline for a single muffin serving. My quantities are always generous, so yours might vary slightly depending on how thick you cut them!
These **homemade english muffins** are surprisingly modest for such a satisfying breakfast treat. They hit that perfect balance of being enough to fuel a busy morning without weighing you down for your afternoon errands.
- Serving Size: 1 muffin
- Calories: 180
- Fat: 4g
- Saturated Fat: 2g
- Trans Fat: 0g
- Cholesterol: 10mg
- Sodium: 300mg
- Carbohydrates: 31g
- Fiber: 1g
- Sugar: 2g
- Protein: 6g
I always tell people this is why these **homemade english muffins** are such a staple in our house. They are warm, comforting, and pack a decent punch of protein and energy without tons of sugar.
A quick but important disclaimer: these numbers are highly dependent on what brand of flour and what type of milk you use! If you add a ton of butter to the griddle, that fat count is going up quickly, trust me! For more official breakdowns of recipes and ingredient sourcing, feel free to check over our disclaimer page. Happy baking, and don’t stress about the numbers—just slather on that butter and enjoy!
PrintThe Best Homemade English Muffins with Nooks and Crannies

Make soft, fluffy English muffins from scratch using this straightforward recipe cooked on a griddle for perfect nooks and crannies.
- Prep Time: 20 min
- Cook Time: 25 min
- Total Time: 1 hr 55 min
- Yield: 8 muffins
- Category: Breakfast
- Method: Griddle Cooking
- Cuisine: American
- Diet: Vegetarian
Ingredients
- 2 cups all-purpose flour
- 1 tablespoon granulated sugar
- 1 teaspoon salt
- 1 packet active dry yeast (2 1/4 teaspoons)
- 3/4 cup warm milk (about 105-115°F)
- 2 tablespoons unsalted butter, melted
- Extra flour for dusting
- Butter or oil for griddle
Instructions
- In a large bowl, whisk together the flour, sugar, and salt.
- In a separate small bowl, dissolve the yeast in the warm milk and let it sit for 5 minutes until foamy.
- Pour the yeast mixture and the melted butter into the dry ingredients. Mix with a wooden spoon until a shaggy dough forms. Do not overmix.
- Turn the dough out onto a lightly floured surface. Knead gently 5 to 7 times until it just comes together into a smooth ball.
- Place the dough in a lightly oiled bowl, cover it, and let it rise in a warm place for 1 to 1.5 hours, or until doubled in size.
- Gently punch down the dough. On a lightly floured surface, roll the dough out to about 1/2 inch thickness.
- Use a 3-inch round cutter to cut out the muffins. Place the cut rounds on a baking sheet dusted generously with cornmeal or flour.
- Cover the rounds loosely and let them rest for 30 minutes.
- Heat a dry griddle or large skillet over medium-low heat.
- Cook the muffins on the griddle for 8 to 12 minutes per side, flipping only once, until golden brown. The internal temperature should reach 200°F.
- Remove from the griddle and let cool slightly on a wire rack. Split them open with a fork to reveal the nooks and crannies.
Notes
- For the best texture, split the cooked muffins using a fork rather than a knife.
- Cook them low and slow on the griddle to ensure they cook through without burning the outside.
- You can substitute half the all-purpose flour with whole wheat flour for a heartier muffin.
Nutrition
- Serving Size: 1 muffin
- Calories: 180
- Sugar: 2
- Sodium: 300
- Fat: 4
- Saturated Fat: 2
- Unsaturated Fat: 2
- Trans Fat: 0
- Carbohydrates: 31
- Fiber: 1
- Protein: 6
- Cholesterol: 10